How to Customise your Email Domain | MoreApp
Do you want to send all MoreApp emails from your own email domain, to make it consistent with your company brand? Follow these steps to set it up!
No MoreApp account yet? Sign up here.
This feature is available in the Branch, Tree and Forest plan. Visit our Pricing page.
1. Go to Settings
Log into the MoreApp Platform and go to Settings.
Once you are under the Settings tab, on the top menu, click on Email domain.
Note: By default, this setting is only visible to the Account Owner.

2. Configure your Domain
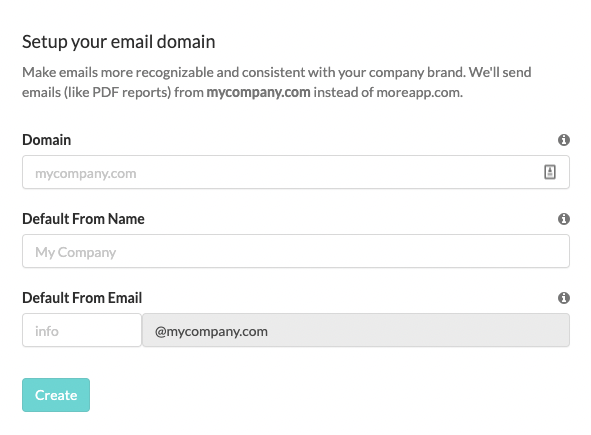
In order to set up your email domain, you just need to fill in three fields.
-
Domain: This will be the domain used to send your emails. Write down your company’s domain.
-
Default From Name: This is the name from which the emails will be sent. Add a name that can be recognised by the recipients of your emails. You can use the company name.
-
Default From Email: This is the name which will be added before your domain. For example, add the word ‘info’ if you want the email to be info@mycompany.com. This address can also be used as the reply-to address.
Click on Create when done.

To which emails does this feature apply?
The custom domain will be used for emails regarding submissions, Excel export, password reset, inviting new users or failed integrations.
3. Verify DNS records
The next step is to add DNS (Domain Name System) records to your domain provider to verify that you own this domain. The verification of DNS changes may take a while, up to 48 hours.
Your custom email domain will only be activated once you have successfully verified the domain.
Note: If you do not verify your DNS settings, it will be removed after 2 weeks. In that case, you will need to start over again.
To verify your domain, you must configure the DNS records provided in our Platform. These DNS records are necessary to ensure your ownership of the domain and reliable email delivery.
The procedure for adding DNS records to the DNS server for your domain depends on who provides your DNS service. Consult the documentation for your DNS service for specific instructions.
4. Congratulations!
You have successfully configured your custom email domain! Now, the emails for your submissions will be sent from your company domain.
Note: If you delete your custom domain or if you remove the DNS records, we will automatically revert to using MoreApp’s email domain.
Want to stay up to date with our latest tutorials? Go to YouTube and hit the Subscribe button!