No MoreApp account yet? Sign up here.
This feature is available in the Branch, Tree and Forest plan. Visit our Pricing page.
Note: Data entered with Subforms is not supported by the Google Sheet Update integration.
1. Import a Google Sheet
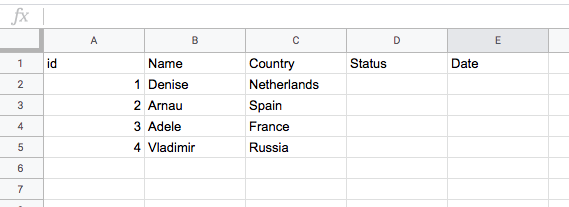
Go to the MoreApp Platform and import a Google Sheet as a data source. Here you can read how.
2. Create a Form
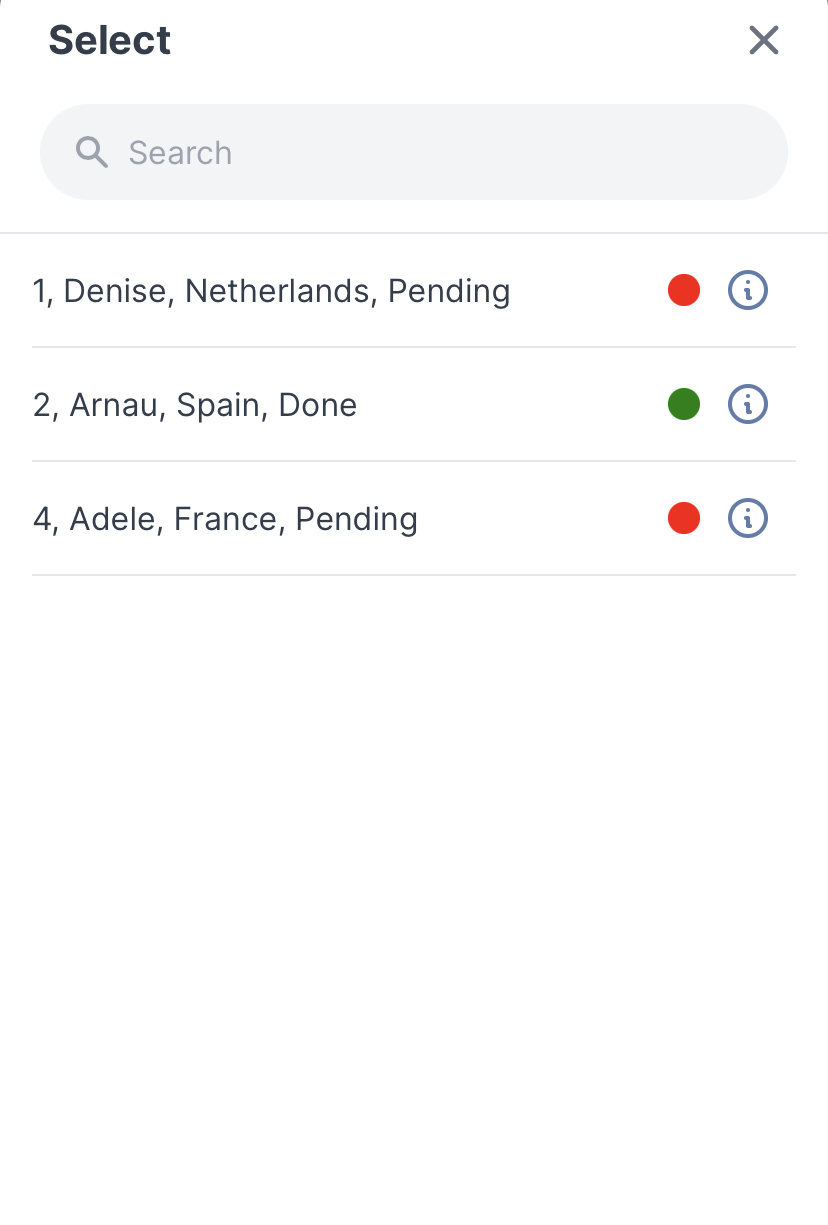
Go to the Forms tab and select your form. Access the Fields menu and add the Search field to your form. Once added, click on the field to configure it. Use the Label to type the name of the field and choose the Data source you just imported.
Add a Date field. In that way, the date is also added to the sheet.
Add a Radio field to set the status. The options can be: Done, Not Done, N/A.
Once you have added these fields, edit the Search field again. Select the list of colours you want to show depending on the selected option. Keep in mind that the query needs to be the same as the status added to your data source, so the colour is properly assigned.

Note: Read more about the configuration of the Search field here.
3. Configure the Integration
If your form is ready, you can move on to the configuration of the integration.
Go to the Integrations tab. Then, click on Add integration and select the Google Sheets Cell Update integration.
We configured the integrations as follows, to show you an example:
In this case, we added two integrations. With the first integration, you will update the Status in the sheet. Add the Spreadsheet ID of the same data source that you used to import. Fill in the Sheet name. Pick the Search field and the Radio field. Last, fill in the Column name to update.

Click on Verify.
With the second integration, you will update the Date column in the sheet.

Click on Verify and Publish.
4. Complete a Form
Now it's time to test! After filling in a form, the next time you open the form, you will see that the values have been updated and colour has been added.
5. Internet Connection
Since the data is sent in real time, an internet connection is needed. We are happy to explain why.
- The App sends data to the Platform, where the integration is executed that sends the data to the sheet.
- The sheet is automatically imported into the Platform every 15 minutes.
- The App downloads the new version every 15 minutes. This can be accelerated manually by refreshing the App.
In this way, the correct data is always available in the App.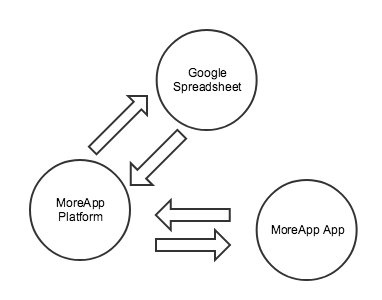
6. No Internet Connection
What can you do if there is no internet connection on location?
- Make sure you connect to the internet after an inspection.
- After fifteen minutes the data of the inspection will arrive in the Platform.
- Then, in the App, pull to refresh and you are ready for the next inspection!
Want to stay up to date with our latest tutorials? Go to YouTube and hit the Subscribe button!