
No MoreApp account yet? Sign up here.
1. Invite a User
Once you have logged into the MoreApp Platform you can go to the Users page, under the User management tab, to get started.
Once there, you will have to click on + Invite user. You will see that you have the option to select a single user or multiple users.
Click on Single user to add the user you would like to invite by filling in the email address. Select the language of the invitation, the role and the group the user needs to be added to. Lastly, click on Invite.
The person that you invited will receive an email to activate the account. Invites expire after 30 days.
2. Invite Multiple Users
You can also invite multiple users at the same time using an Excel file with email addresses. Keep in mind that all the email addresses have to be inserted in the first column of the spreadsheet.
After having clicked on Upload Excel file, you can browse for your Excel file. Once your file is uploaded, you can select the language of the invitation, the role, and the group the users need to be added to. Lastly, click on Invite.
The users that you invited will receive an email to activate the account. Invites expire after 30 days.
3. Search for a User
You can search for a user by typing the name or email in the search bar at the top of the screen.
4. Groups
Go to the Groups tab if you want to create groups to organise your users. Click on + Create group. Give the group a name and click on Create.
Then, click on the name of the group to open the settings. You will see 2 tabs: Group members and Role & permissions.
4.1 Group members
At the Group members tab, you’ll see the users that are added to this group. To add a new user, click on + Add user in the upper-right corner.
If you want to remove a user from the group, click on the bin icon that appears next to the user’s role.
If you want to see the details of a specific user, click on that user to open the permissions page. Once you are on the user page, you can edit the name of the user by clicking on the pencil in the upper-right corner.
4.2 Role & permissions
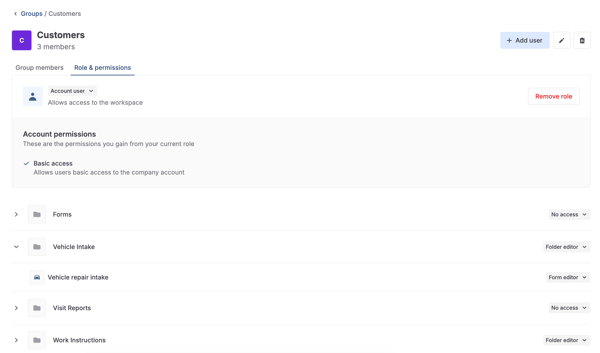
On the Role & permissions tab, you can give the group permissions.
Here you can adjust the permissions by selecting the proper role in the dropdown. Once a role is selected, you will see the Account permissions for that group.
At Account level, the users can be: Account owner, Account administrator or Account user.
Then, you can define which folders and forms the user has access to. If that user is an Administrator of the account, you will see a message informing you that the user has permissions to access all folders and forms.
-
On Form level, the user can be: Form editor or Form submitter
-
On Folder level, the user can be: Folder editor
5. Manage Roles
Go to the User management tab and click on Roles.
5.1 Default Roles
The Default Roles are provided by default for every customer.
|
Role |
Description |
Permissions |
|---|---|---|
|
Account owner |
Allows full control over the account. This is the highest-level role. |
|
|
Account administrator |
Allow administrators to manage users, connections, folders and forms. |
|
|
Account user |
Allows access to the workspace. |
|
|
Folder editor |
Allows managing the folder and its content. |
|
|
Form editor |
Allows managing forms, submissions and tasks. |
|
|
Form submitter |
Allows users to submit forms. |
|
5.2 Custom Roles
Creating a Custom role is a feature named Advanced User Management available from the Tree plan.
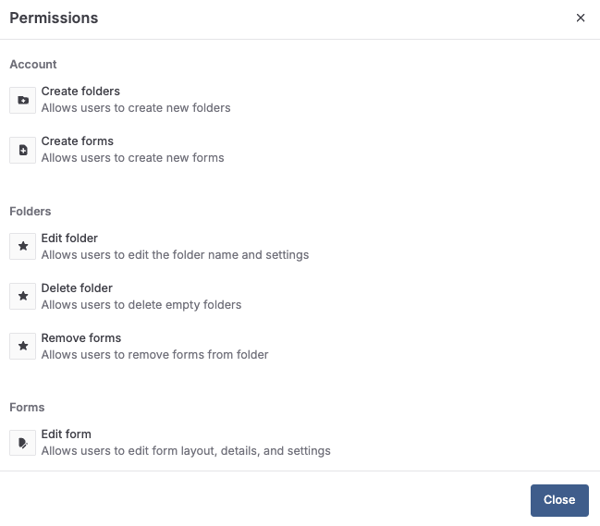
Click on + Create role. Give the role a name, add a description and choose the role scope: Account, Folders or Forms. Once this is decided, click on Next.
Then, select the different permissions you want to include for that role and click on Create.
After you have configured the Custom role, you can add the Role to a specific User or Group.
6. Manage users on Form level
Go to the Folders section, open a form and click on the Permissions tab.
Here you will see the users and groups with form permissions, and the role they have for this specific form.
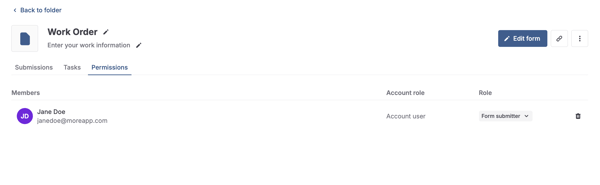
Note: You can also find the Permissions tab at the Folders level.
Want to stay up to date with our latest tutorials? Go to YouTube and hit the Subscribe button!